The Ultimate Pantry Layout Design

The Ultimate Pantry Layout Design
DISCLAIMER: This post is sponsored by Shaw Floors. All opinions are my own.
Thank you to Shaw Floors for sponsoring this post! Post contains affiliate links.
It’s FRIIIIIDAYYYYY! I got back from California Wednesday evening so this week has been extra extra short and sweet! Add in jet lag naps and it’s been even shorter ;-). California is one of my very very FAVES so being there combined with being with some of my best blogging friends made for an extra special week. I will be sharing my full trip and experience at the Designer Bloggers Conference very soon but let’s just say that I got to hear Amber Lewis Interiors and Studio McGee speak and it was just what this design loving and interior design firm desiring momma needed to launch my next dream… Addison’s Wonderland Interiors. More on that soon. As well as my love for the West Coast which has led me to spend this Summer there. The summer before I launch said dream. Yes, more on that soon as well!
So you know when you have something huge coming up but something else comes first so the something huge never ever seems like it will happen??? That has literally been me for the last two months. Between Mark’s ACL recovery and my trip to California, everything beyond those events seemed so so far away. Yet now they are so very near!!! The day I returned from my Orlando trip in January, I got probably the most exciting e-mail of my life. You guys know a little about it but I can’t say any more than that quite yet. It’s something y’all know is coming but it got way way better. Sorry for the vagueness. That drives me nuts but let’s just say that you will all see it at your local grocery store on March 21st ;-).
I sat at the LAX airport on Wednesday for several hours since the drive and airport security wait were much shorter than expected and I got started on the longest blog post EVER. The complete and full wrap-up and super detailed post-construction tour of Our Historic Wonderland. And then I realized I wasn’t even done yet! I still have our pantry, powder room and guest bedroom reveals to share so I closed out that halfway finished post and began on this one. Our pantry…
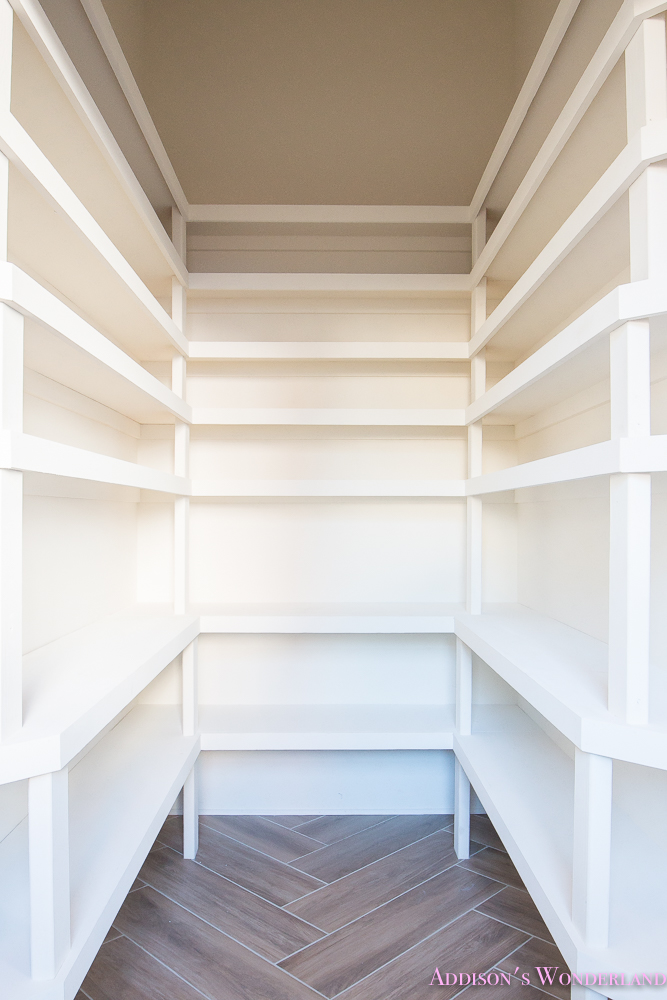
This is definitely the tiniest room reveal of all thus far but honestly one of my favorite things about our home restoration. Because it means storage and organization! Things I crave but honestly have had little time to tackle just yet. So basically the current state of our pantry is one super hot mess.
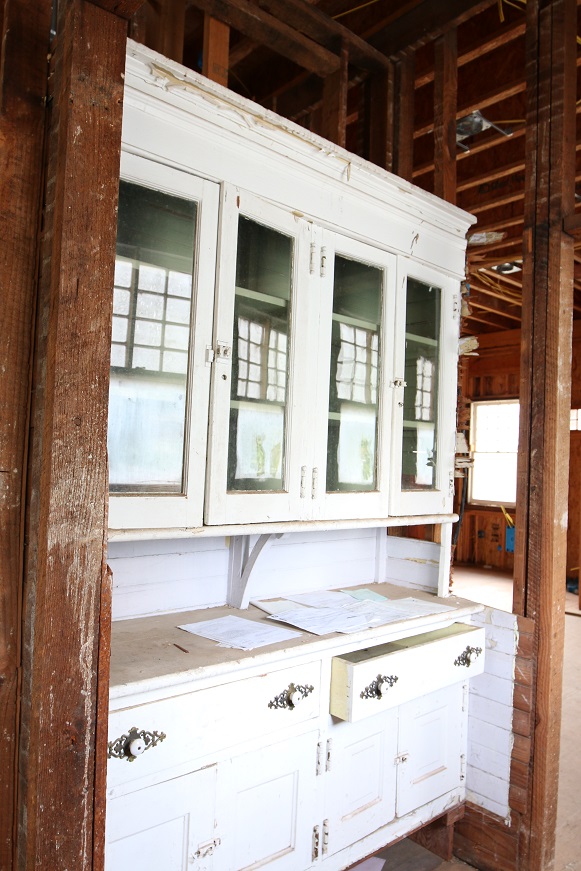
After we moved every room here, there and everywhere in the early days of our OHW restoration, I had originally just planned to do tall pantry cabinets in our kitchen next to the refrigerator. And then I sat down and laid out my “dream home list” via my Pinterest boards and daydreaming visions and quickly realized that a large-ish pantry was at the top of the list. But where oh were to put it?? If you remember the dining room became the kitchen and the kitchen became our family room. Between those two rooms were an amazing 111 year old butler’s pantry cabinet which was one of the only original details of our home. HOWEVER, since we planned to use that back room as our family room I just intended on making the room that much larger once we removed the butler’s pantry and dumb waiter. Oh decisions… decisions… It really is so hard and honestly quite impossible to work in every detail you hope for in building or restoring a home but sometimes you just have to work things in and hope the rest falls into place. So that’s exactly what we did. We built out a large-ish pantry in place of the original butler’s pantry and dumb waiter and just made our family room that much smaller. I was so so worried I would regret it BUT the family room is plenty big now, which you will see in the next week or two AND I now have plenty of storage for food AND my million and one pitchers, serving platters and tableware. So let’s take a peek at the space BEFORE. Like DAY ONE BEFORE…
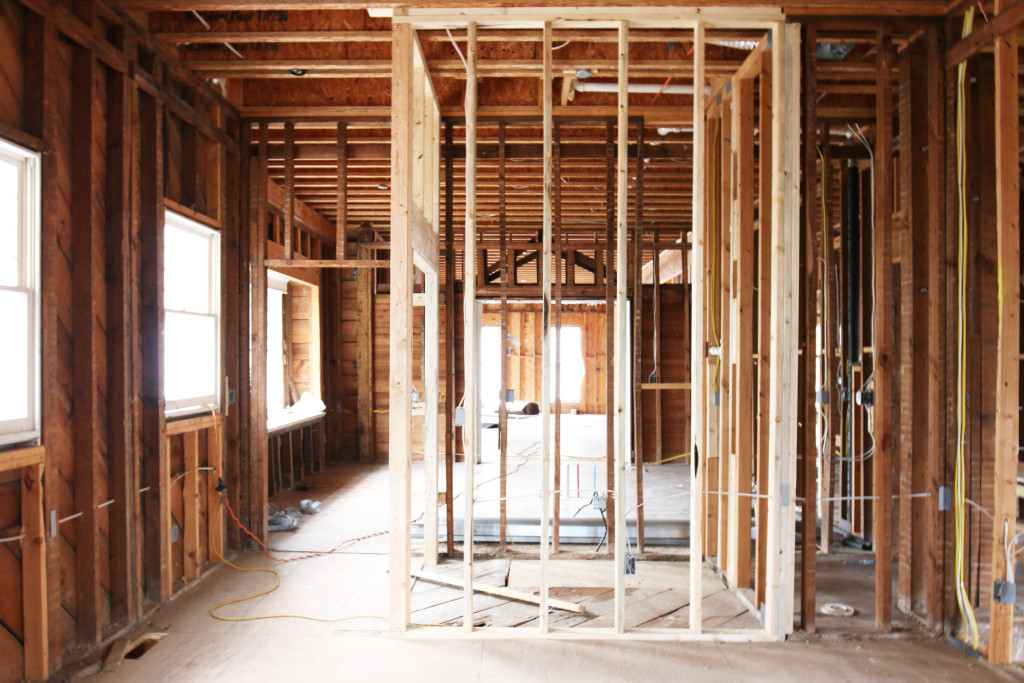
And then “BEFORE” once we re-framed this space…
Okay so I finally have to share the sad sad new of what happened during our restoration that I have yet to blog… our framers freaking damn THREW AWAY the butler’s pantry cabinet. Like in the trash. I think I freaked a tad when I realized that it was in a million pieces in our dumpster. Ugh. Ugh. AND UGGHHHHHHH!!!! I was hoping to repurpose it for a bathroom or furniture piece but we had to say goodbye that day. And it was a sad sad day.
One last thing before I share the reveal… Once again I partnered with the oh so fabulous Shaw Floors to complete this space. I wanted a little bit of a wow factor to make our pantry extra specially cute so I chose Shaw Floors’ Valentino 8″ x 32″ Glazed Porcelain Tile in a “Wood Look” laid in a herringbone pattern to add an extra special detail to this room. And I LOVE the way it turned out! I love that it coordinates with the wood tone we have elsewhere in our home yet is waterproof and pretty much life proof since it is a porcelain tile. There is an entire line of these Valentino tiles in a wide range of colors that are perfect for everything from a pantry to an entire kitchen!
So here’s what we did to transform this space…
1. First, we removed the dumb waiter and butler’s pantry and then framed out the pantry space as you can see above.
2. Spray foam insulation (ceiling).
3. Sheetrock.
4. We installed beautiful thick molding on the baseboards, crown and windows! Read more about that HERE… “Trim, Ceilings and Moldings Oh My!“
5. Paint! Read more about that HERE… “Paint, Paint and More Paint…“
Wall and Trim Color- Alabaster by Sherwin Williams
Door Color- 1/2 Stardew and 1/2 Uncertain Gray by Sherwin Williams
6. Flooring!
Shaw Floors’ Valentino 8″ x 32″ Glazed Porcelain Tile in a “Wood Look”
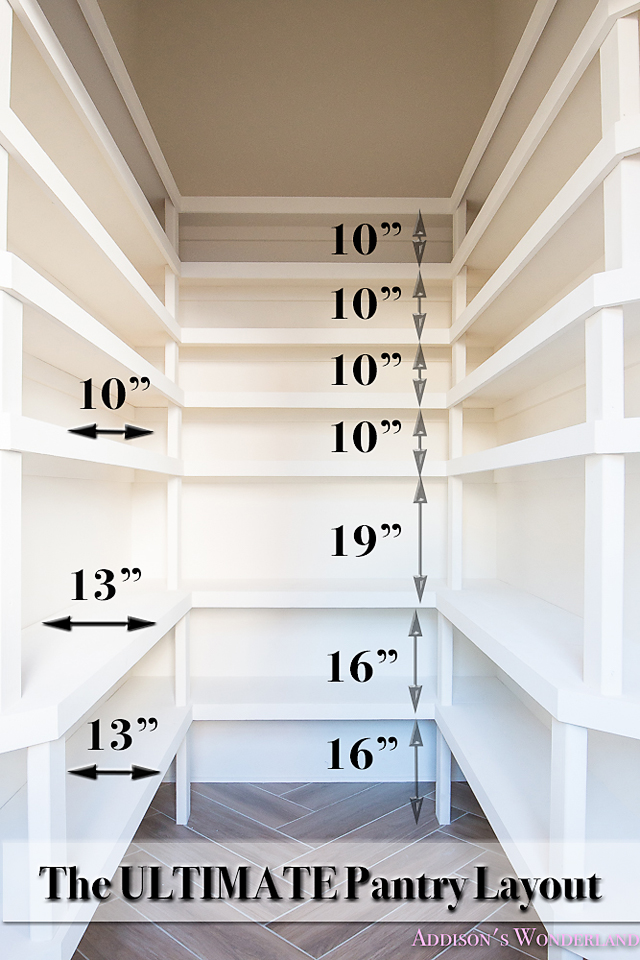
7. Shelving! (see the detailed measurements and plan below)
8. Lighting!
Lantern… Shop It HERE
Shop This Post:


XOXO, Brittany Hayes

Which light fixture did you use? I can only see a tiny bit of it in one of your pictures. Just curious!
I actually linked it in the post under “Shop this Post” above the reveal images. Thanks!
Amazon pantry and flooring! Will you be adding some of your signature pops of color there?
Thank you dear! Gosh I am not sure yet! Haven’t really made a plan on decorating it quite yet. It needs some mega organization first ;-). XOXO
Doesn’t need “pop”. Pantry items in clear containers is all it needs. Keep it simple.
I would looove to have all that pantry storage – awesome!!
The light of your picture are so perfect. Do you use filters?
Beautiful pantry. What are the dimensions?
I’d love to know the dimensions, too! 🙂
Looking at the tile demensions I’m guessing it’s 4-5 feet wide and 5-6 feet long.
Good luck!
Hi! It is 5′ wide and 6.5′ deep. Thank so much and stay tuned for a pantry update with organization ideas! XOXO
Love the pantry about how much did it cost to complete pantry? I’m buying a house and need to add a pantry I think I’m gonna use this one.
Did you post updates yet ?
Would love to see
This is amazing! So sad that the original butler pantry cabinet!
My husband and I are working on plans to build, what are the dimensions of your pantry? It is the perfect size!
What are the dimensions of this pantry?
Hi
What is the whith and depth of this pantry?
What is the depth of the shelves?
Thank you in advance
Please tell us the dimensions of the pantry. Thank you!
I would love to replicate this. What are the dimensions?
So many of us want details on the dimensions ….. please !
Hi! It is 5′ wide and 6.5′ deep. Thank so much and stay tuned for a pantry update with organization ideas! XOXO
Question! Love the dimensions provided but what is the space from the left shelf to the right, the width of the walk way. ??
I would love to know the depth of shelves? Also how big is the walkway? We are building and ours is 5′ wide. So trying to make a plan for the shelves. Thank you. Love your pictures.
What kind of material are the pantry shelves? Thanks!
Yes. Please share what the shelves are made of. I am thinking of doing a lamin as tw white shelving but these look like real wood!
I’m also interested in knowing what you used for the shelves. The pantry in my house is 6’x8′ and I’m going to be building out shelves for it. I love how yours turned out, especially with the 34° cut on the front corner. Ingenious.
Have you used some kind of warming? We are also doing repairs now, and we are going to use foam insulation, walls and a roof. What do you say about this?
In general, everything looks very nice)
This post has been so helpful to me over the last few weeks. We are redoing our pantry closet, which is not near as large as yours and barely walk in. My husband calls it a lean in pantry. Hahaha! Having the diagram with the measurements solved so much as I questioned the spacing of the shelving. Thank you for taking the time to share your process!
Is there anything you’d change about this pantry now that you’ve used it for awhile now?
Thank you.
We are thinking of using a valentino tile throughout our house. Do you remember the color you chose?
Do you remember the name of the wood look tile you used?
Please answer comments and questions!! Where did you get the selving? Thanks
Shelving likely made on site.
Hey! Love your beautiful home. I see a ton of great wallpaper choices throughout your tour. Wondering what a few of your top wallpaper sources would be?
I just finished our walk-in pantry remodel off our kitchen. Assuming you have 10 foot ceilings like we have, I took note (in your pics) of wasted space from top shelf to ceiling. The distance between shelving could have been increased to take better advantage of free space and to store large and tall, little used kitchen items like prep appliances (Kitchen Aid mixer, commercial processor, large bowls, holiday cooking items, etc). This frees up space in your beautiful kitchen cabinets. Our pantry was too dark. We painted dark walls and shelves in an off white color and added 3” LED pot lighting with a simple ceiling fixture to better see into the shelving. I increased the depth of one flanking wall of shelves to 24,” (our ‘L’ shaped pantry is slightly wider than yours), added another 24” shelf, and increased distance between shelving. My wife said that improvement was a godsend. Short depth shelving (10-12”) frustrated us as we couldn’t store many canned items in rows. I added some panache with 6-1/2” beaded crown. Like closets, pantries are inherently dark. Painting them in a light color (like you have done), and adding numerous lights, serve to eliminate shadows and help you find what you’re searching for. A 3 step folding ladder aids in reaching top shelf items. We love your herringbone tile floor. You did a great job!
Rick, I would love to see your pantry completion. Any photos available?
What were the estimated cost to build this pantry?
What is the overall height, width, and depth of the pantry space?
Would love to know what materials you used. Did you have any shelf supports? What did it cost?