Addison's Wonderland

  • Blog
  • Shop
    • Fashion
    • Home Decor
    • Gift Boxes
    • Brick and Mortar
  • Stay
  • Design
  • About
    • Our Story
    • Contact
    • Press
  • Tour

November 2, 2015

How to Paint Hardwood Floors

Paint Hardwood Floor Banner

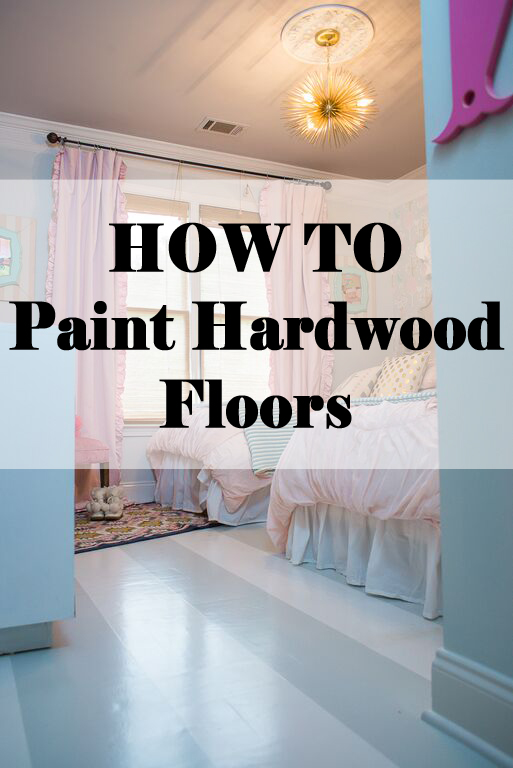
How To Paint Hardwood Floors!

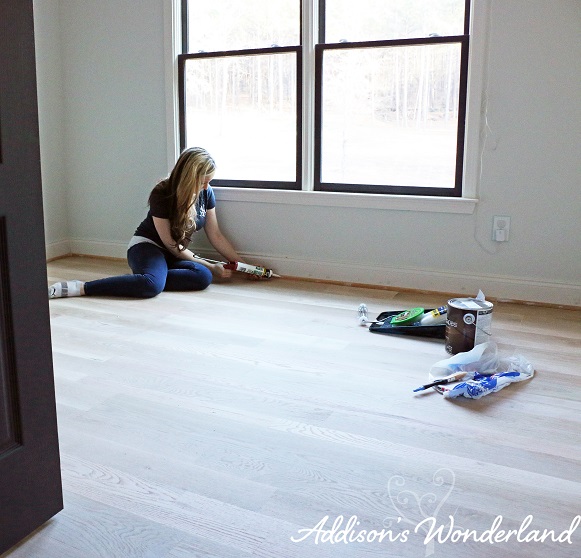
Whew!  What a crazy, paint fume filled, toddler pack n’ play sleeping, late night DIYing couple of weeks!  I’ve done quite a few written designer interviews lately for some upcoming projects and I’m always asked to describe my style.  Gosh, what a hard question!  Sounds so easy yet I honestly just call my style: ME.  And then, as I was painting brand new wood flooring last week and my hubby walks in wide eyed I thought, FEARLESS.  That is exactly how I would sum up my style and design philosophy.  I mean, why not?!?  Anything can be re-painted, most products can be returned and it’s your home so WHY FREAKING NOT?

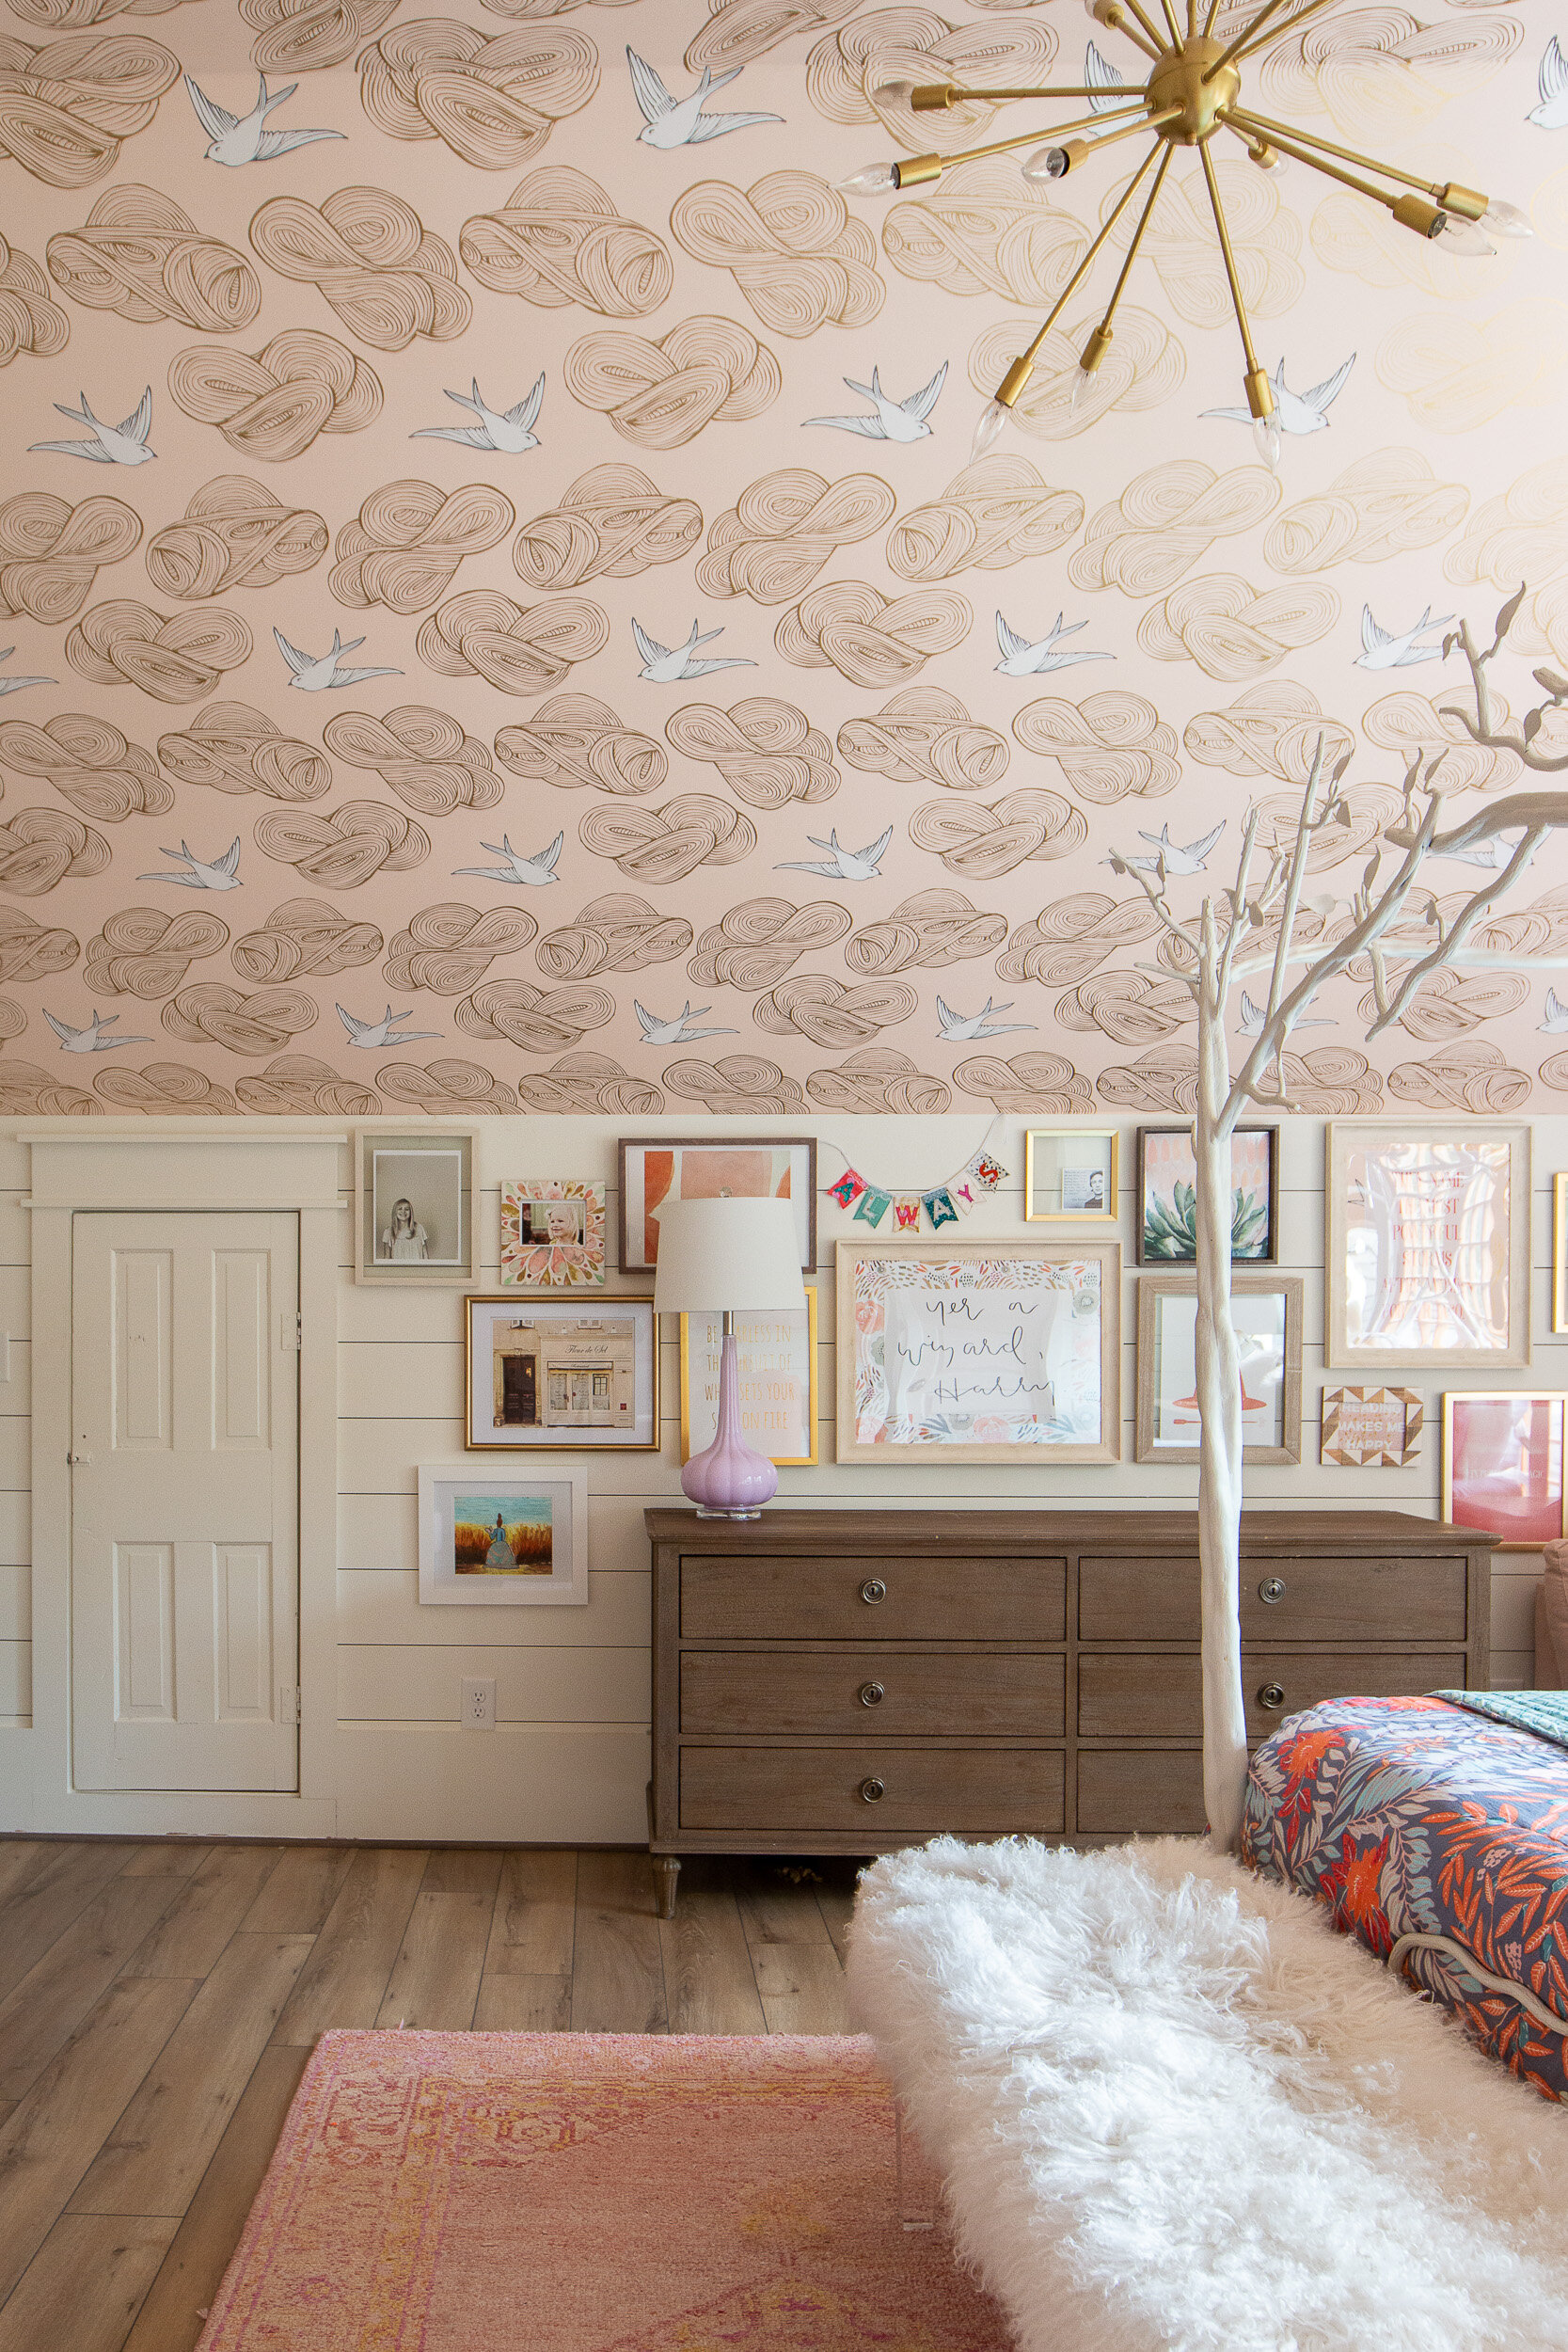
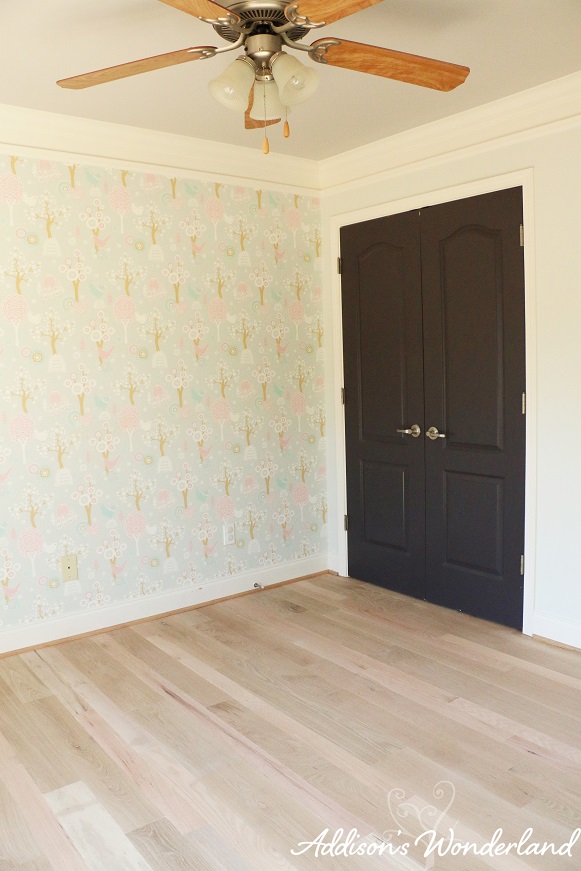
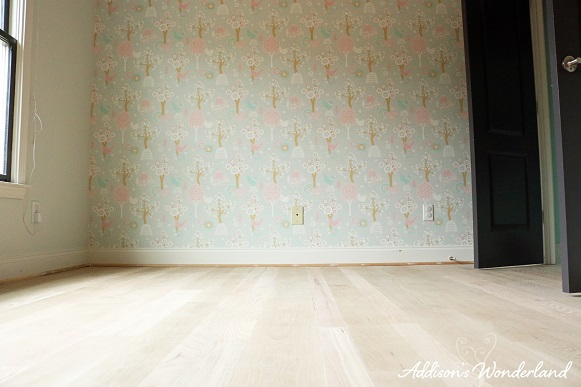
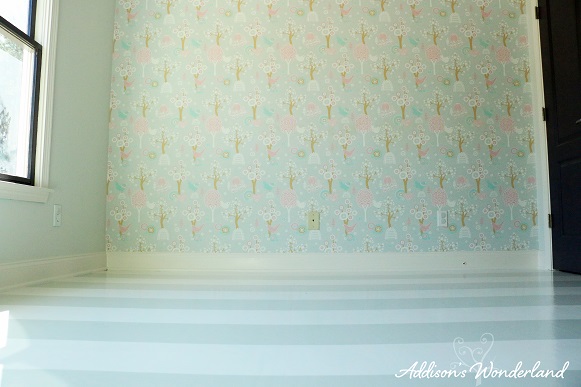
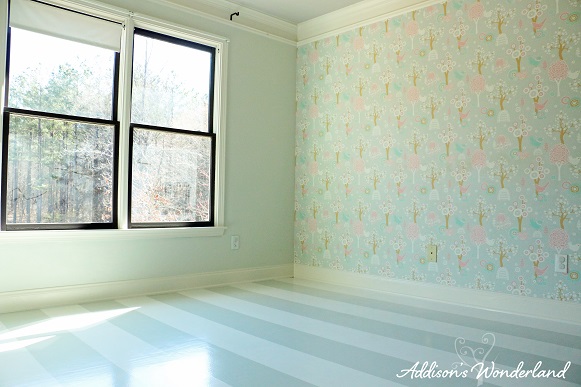
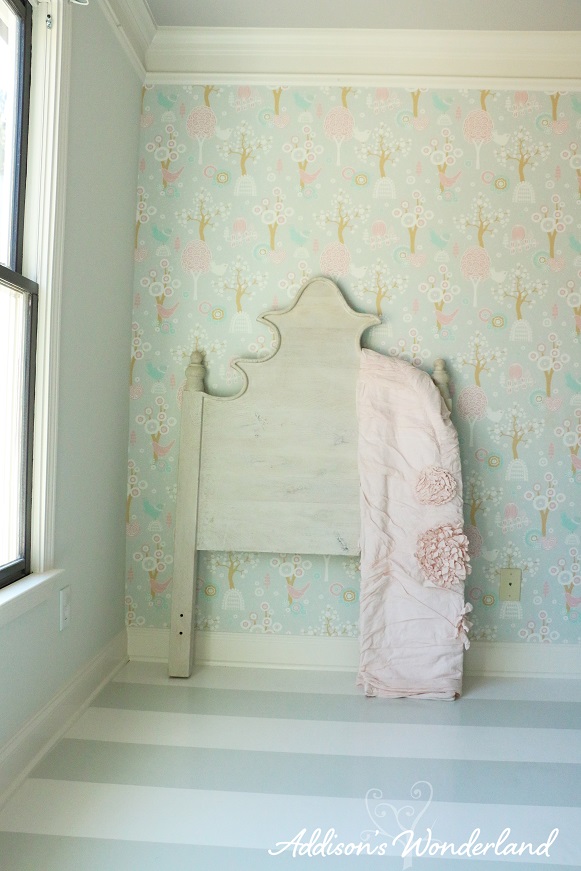
I’ve tackled a wide assortment of DIY projects over the last ten years or so of my home improvement lifetime yet painting wood flooring was not yet checked off of my bucket list.  I knew I wanted to try it and didn’t quite know where until I started designing my daughter Winter’s big girl room.  I love layering patterns yet I somehow still wanted to keep her room pretty neutral and simple so the flooring was the perfect place to incorporate more pattern.  And once we decided to finally install new white oak hardwood flooring (Read the Post) upstairs, I knew the time had come.  For Winter’s room, we simply had a raw, unfinished oak hardwood flooring installed and sanded down.  The next steps were all me…

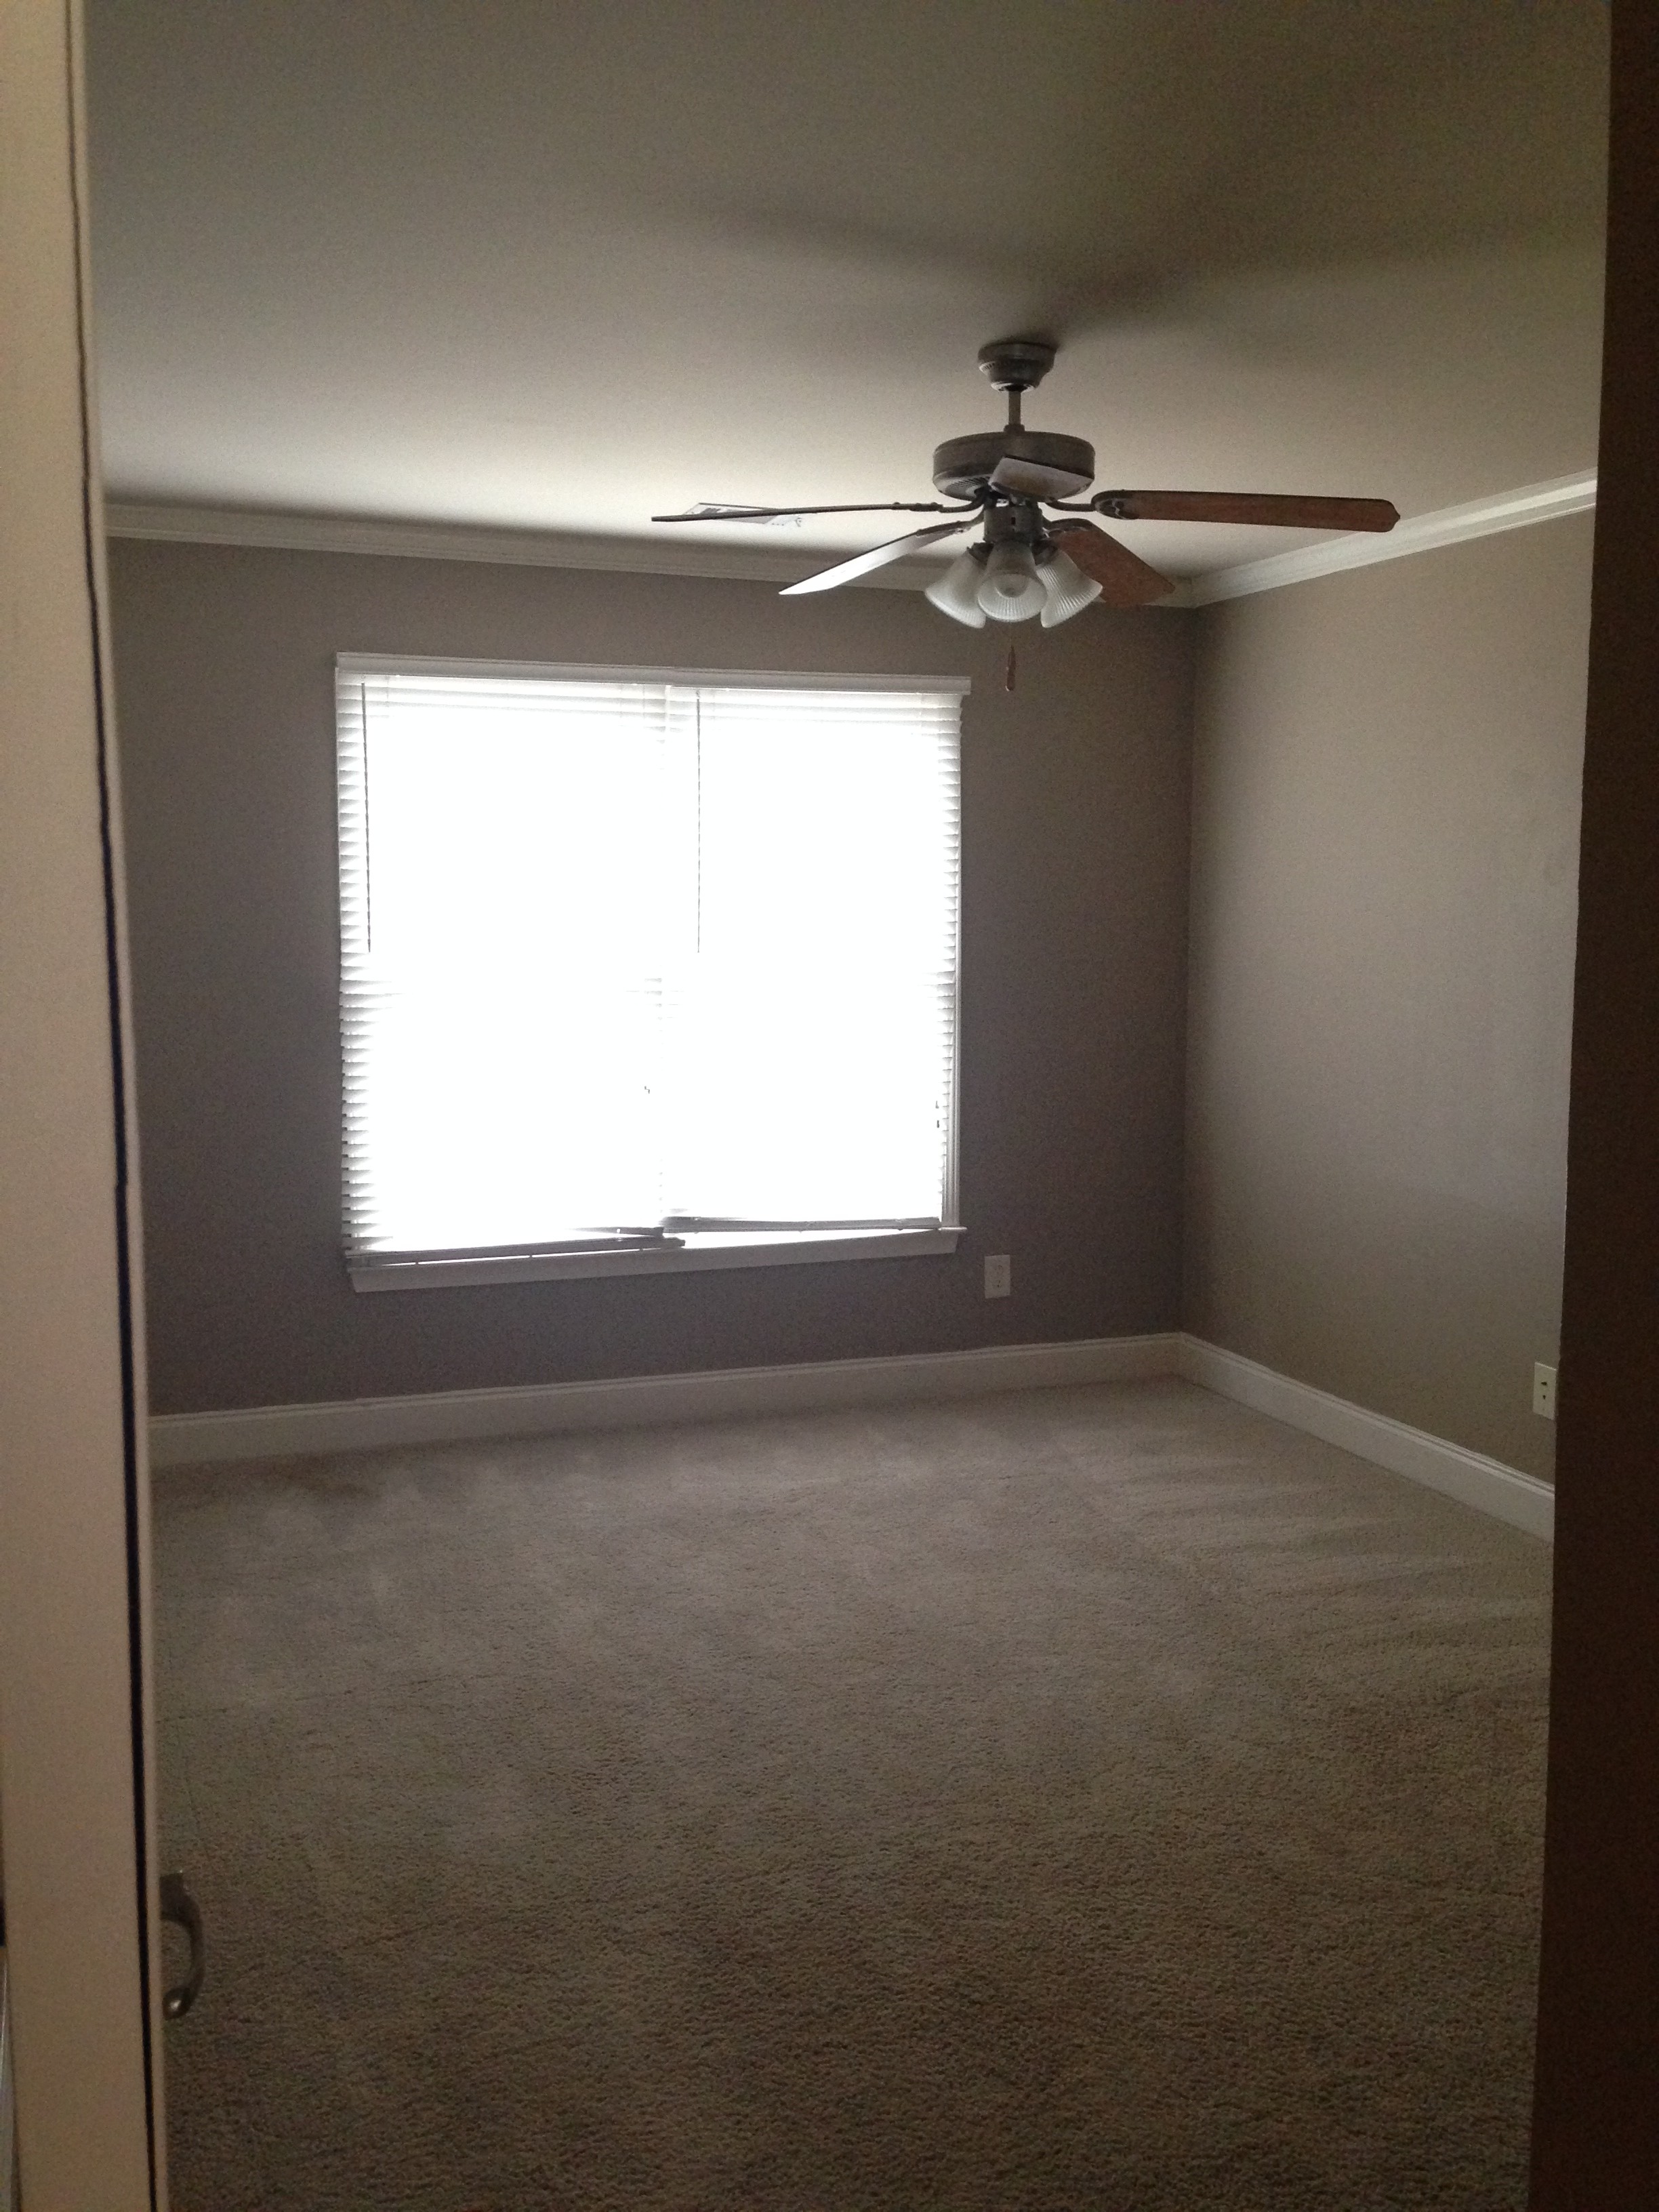
BEFORE (True Before)

photo 2(3)

BEFORE (Winter’s Nursery)

W Room 400

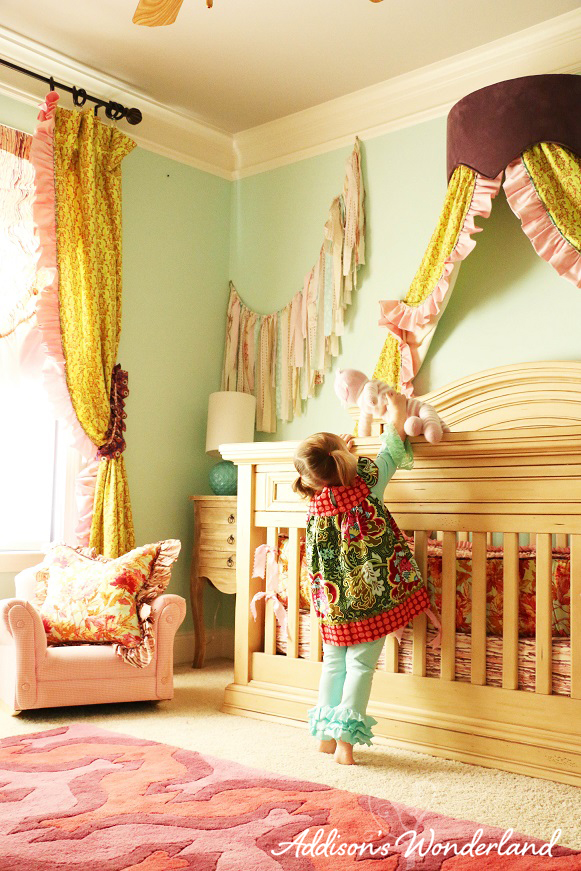
Read More on Winter’s Nursery…
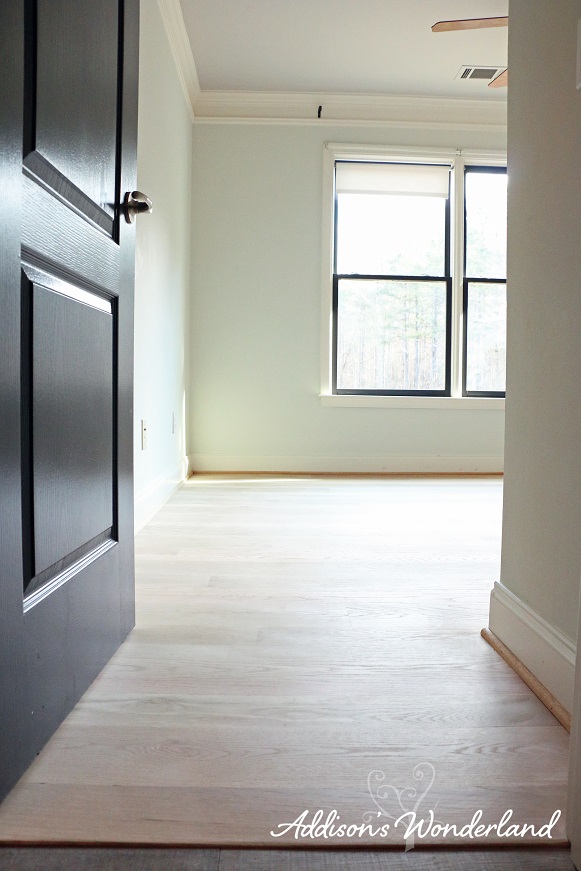
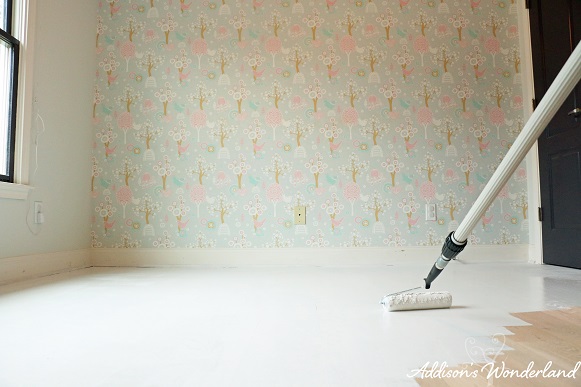
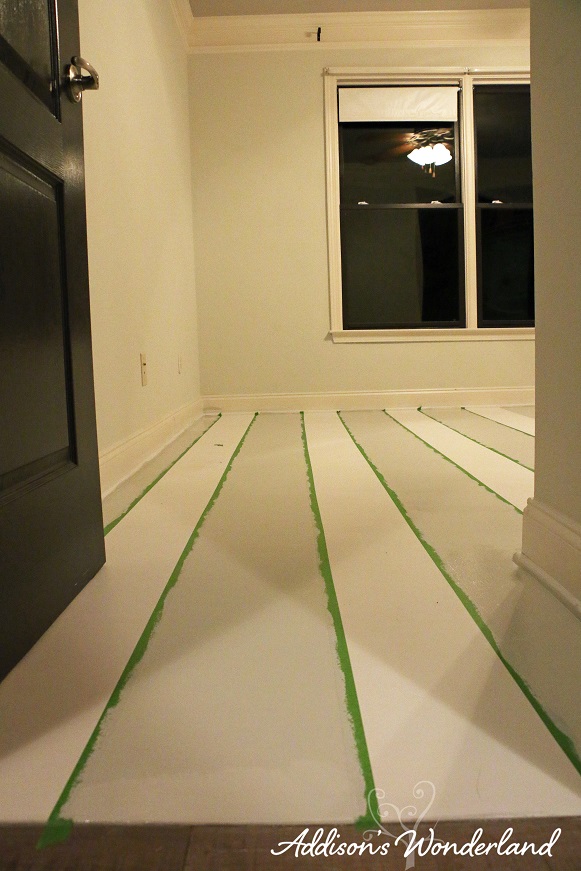
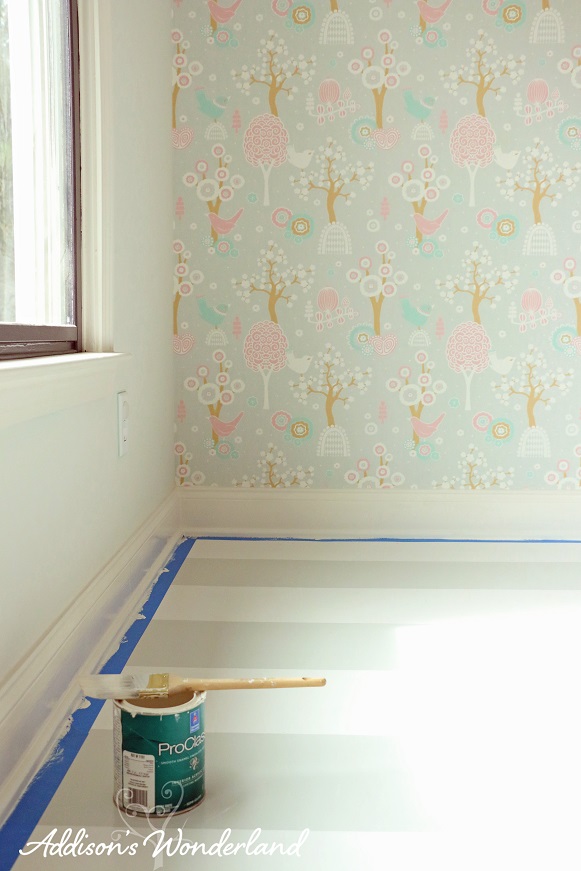
IN PROGRESS

New Hardwoods 5_edited-1 New Hardwoods 3_edited-1zPainted Stripes Hardwood Floors 1

THE PROCESS

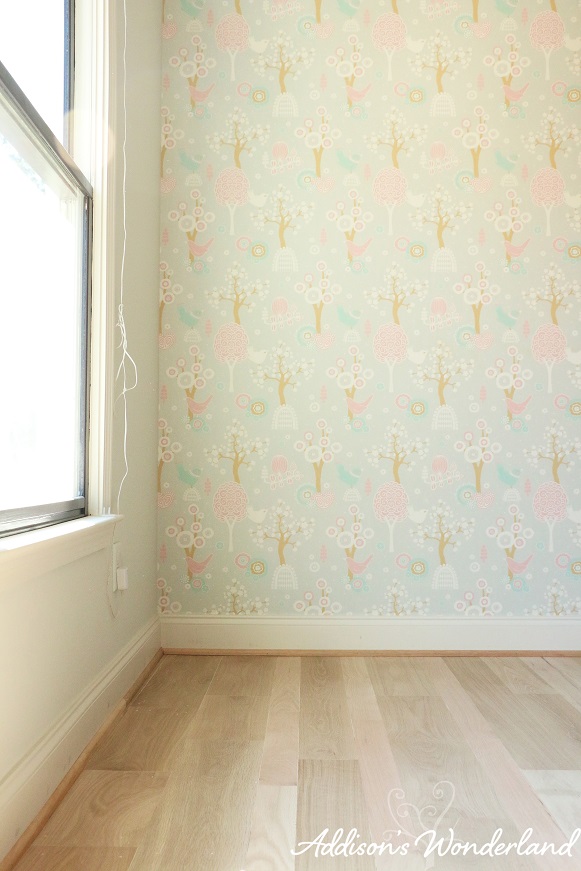
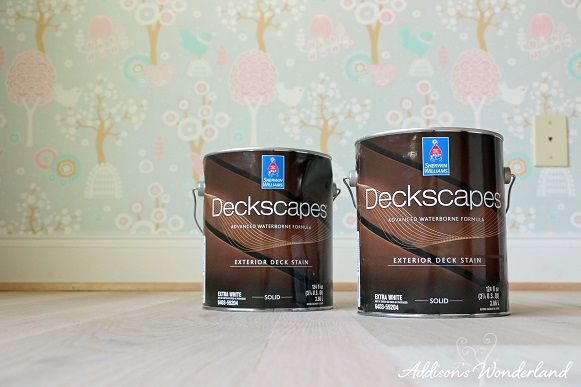
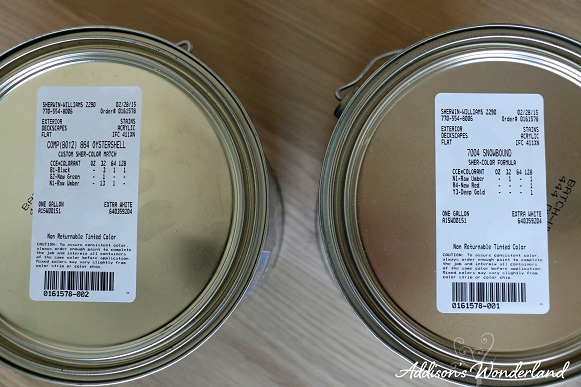
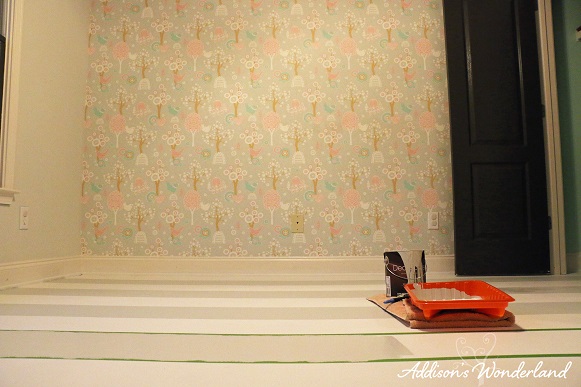
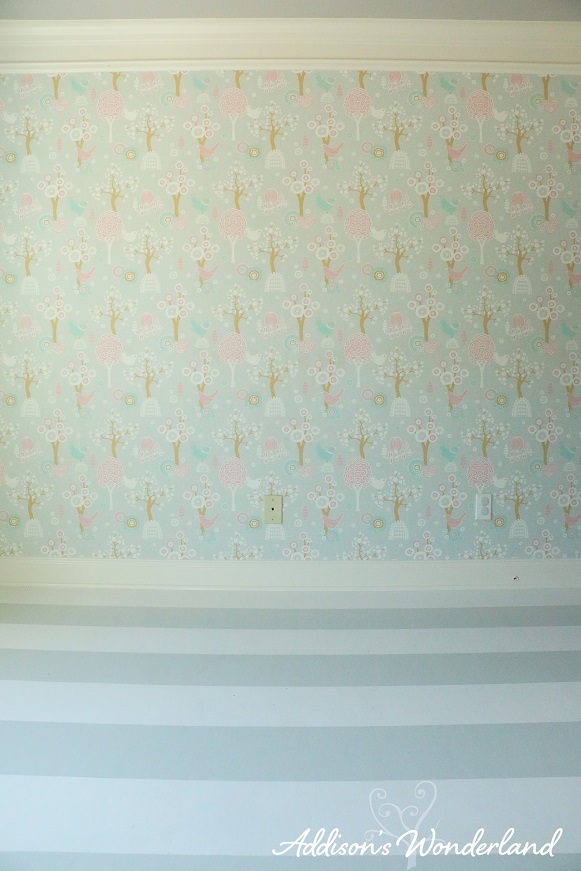
With the advice of our professional hardwood flooring installer, I used a water based solid deck stain for the flooring paint.  This option is much less likely to chip and scratch than a typical paint and the water based option does not fill your home with strong fumes.  For the colors, I wanted to coordinate with the wallpaper so I had the wallpaper color matched at my local Sherwin Williams store and then I chose a gray one shade darker.

 Painted Stripes Hardwood Floors 2 NEW

Snowbound by Sherwin Williams

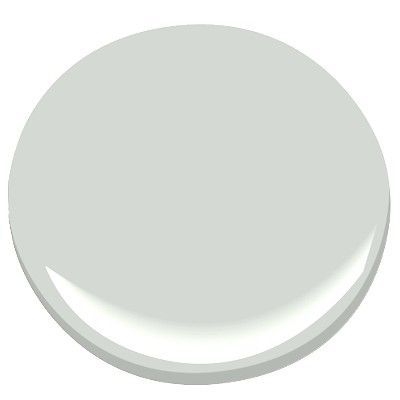
Oystershell by Benjamin Moore
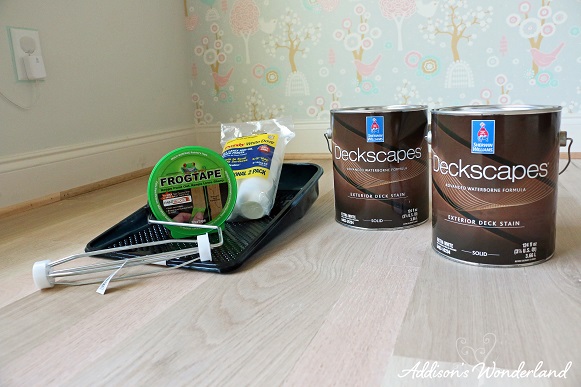
Painted Stripes Hardwood Floors 3_edited-1

Supplies:

Deckscapes Water Based Deck Stain (one gallon per color)

Frogtape

Paint Rollers & Attachments

Paint Trays

Trim Paint

Paint Brush

Caulk & Caulk Gun

Pencil

Measuring Tape

Level

Painted Stripes Hardwood Floors 4

Step One:

Caulk the quarter round to even out nail holes.  This step is for newly installed quarter round.

Painted Stripes Hardwood Floors 5 Painted Stripes Hardwood Floors 6

Step Two:

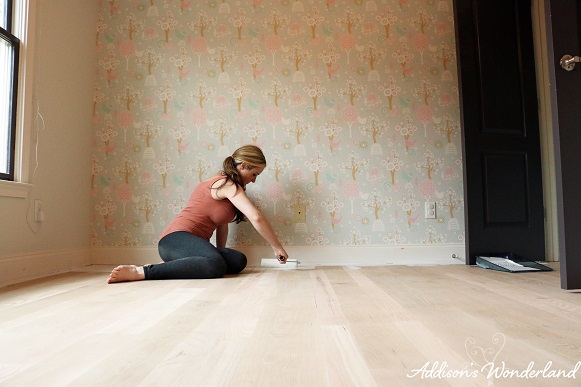
Cut in around the walls of the room using a paint brush and roller.

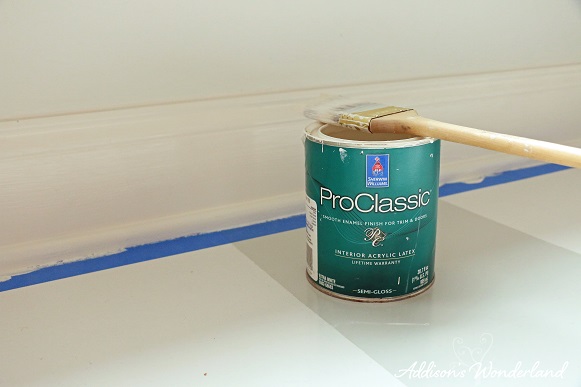
Tip: I chose to paint the baseboards and quarter round after the completion of the painted floor so I did not have to be careful with getting flooring paint on the baseboards.  If you paint the trim first, make sure and tape off the trim prior to painting the floor.

Painted Stripes Hardwood Floors 7_edited-1

Step Three:

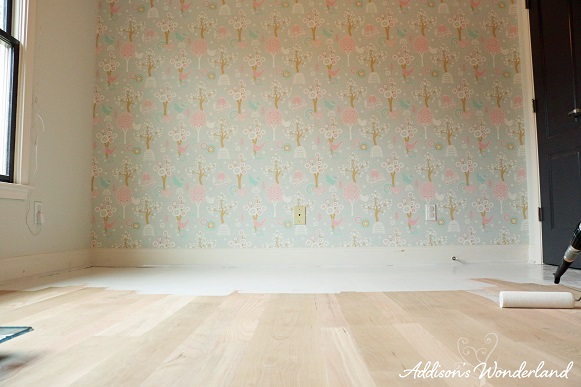
Roll the entire room working your way out of the room.  I re-applied two additional coats of paint to create an entirely solid white floor.  I did one coat per night for three nights ensuring it was completely dry before re-applying another coat.

Tip: Make sure and sweep the room VERY well prior to painting to keep any dust, lint or hair from getting painted onto the floor.

Painted Stripes Hardwood Floors 8 Painted Stripes Hardwood Floors 9

Step Four:

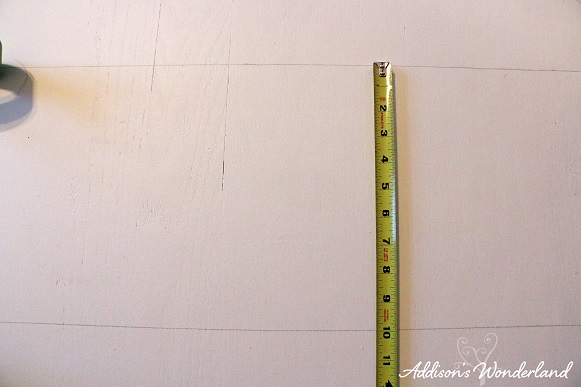
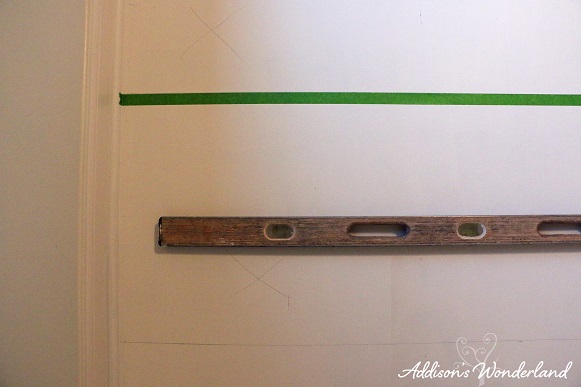
I used a highly scientific method of determining the size of my stripes.  I knew I wanted somewhat wide stripes so I measured the width of the paint roller and added 1″ to make the process that much easier.  LOL!  The roller was 9″ so I chose to do 10″ wide stripes.  I started on the back, wallpaper wall, and measured out 10″.  I marked 10″ about every 3-4′ along the wall with a pencil.  I then used a level to line up the marks and draw straight lines creating the stripes.

Tip: Every couple of stripes, I measured the distance from my most recent line to the wall opposite my starting wall to make sure I wasn’t getting too far off which would make my final stripe uneven.

Painted Stripes Hardwood Floors 10

Step Five:

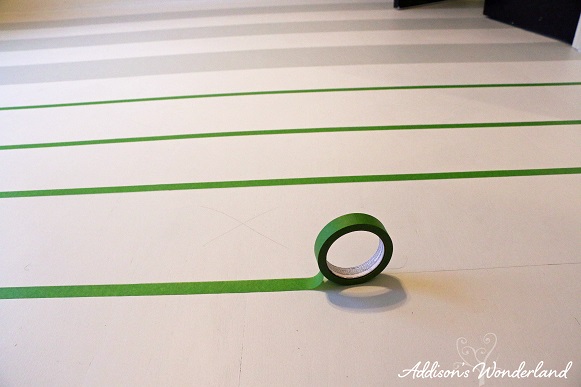
Next, I taped off the lines using Frog Tape which was recommended by my local Sherwin Williams store.  I can honestly say it worked fantastic and there was not really any paint bleeding underneath the tape.  This entire process took me about six nights to complete.

Tip: I only taped off the strips I knew I would have time to paint that evening because I was afraid leaving the tape on for an extended period of time would peel the white flooring paint.  I also “x-ed” off each stripe I would be painting to ensure I wouldn’t get too paint fume crazy and forget which stripe to paint.

Painted Stripes Hardwood Floors 11 Painted Stripes Hardwood Floors 12

Step Six:

Roll the stripes!  I carefully painted each taped off stripe making sure to not paint over the tape.  It took two coats of paint to fully cover the white paint underneath.  I waited about one hour in between coats.

Tip:  Once the second coat was applied, I immediately removed the tape to ensure it would not become too adhered to the flooring and pull off any white paint.

Painted Stripes Hardwood Floors 14 Painted Stripes Hardwood Floors 15

Step Seven:

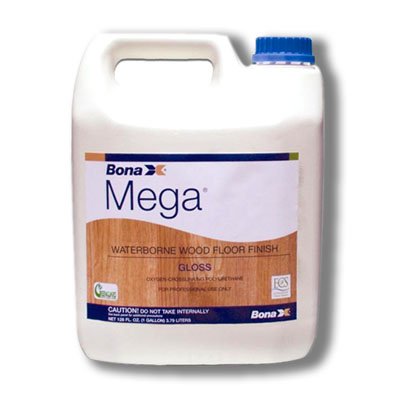
For the last and final step on completing the painted striped wood flooring, I used Bona Mega Wood Floor Finish in Gloss.  This product is suggested for professionals and I had the second and third coats applied by our hardwood flooring company.  I applied the first coat using a paint roller and the following evening, our flooring guy buffed the floors and professionally applied two more coats of the gloss sealer.  This step ensures the paint will not chip or scratch and it also creates a nice glossy finish.

Tip:  Once again I HIGHLY suggest thoroughly sweeping the floors to remove any dirt, dust or hair before applying this sealer.

 Bona Mega Gloss 1 gallon

Step Eight:

Paint the trim.  Once the flooring was completed and dry, I taped off the flooring, painted the quarter round and touched up the baseboards the existing color, White Dove by Sherwin Williams.

Painted Stripes Hardwood Floors 16 Painted Stripes Hardwood Floors 17

For more on the wall colors and other details in this room, read “A Winter Wonderland”.
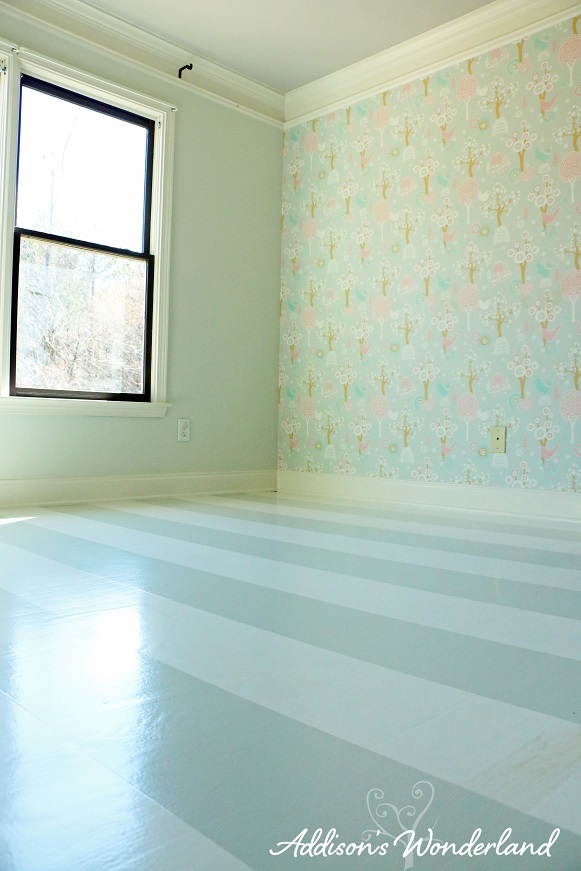
AFTER

 After a week and a half of hard work, I can honestly say that I LOOOVE the result!  The striped painted wood flooring brightens up the room and creates such a statement piece in the room.  Although it is a strong pattern, it still creates a neutral back drop for some fun furnishings and accessories.  I can’t say that any of this process was difficult per say, it was more time consuming and tedious than anything.  It was so fun and relaxing for me and I am SO excited to now complete her room!

Painted Stripes Hardwood Floors 18 Painted Stripes Hardwood Floors 19 Painted Stripes Hardwood Floors 20 Painted Stripes Hardwood Floors 21 Painted Stripes Hardwood Floors 22 Painted Stripes Hardwood Floors 23

PRODUCTS

Claudette Headboard

Claudette Headboard

Majvillan Wallpaper  (Cherry Valley Grey)

3-Bulb Gold Mini Urchin Chandelier

3-Bulb Gold Mini Urchin Chandelier

XOXO, Brittany Hayes

20 Comments - Leave Yours

« Setting the Perfect Holiday Table
Live Q & A Virtual Design Chat! »

Comments

  1. Amanda says

    March 16, 2015 at 3:31 pm

    I love it! So cool looking! And great job! You have to come and help me decorate, when I get a new house. 🙂

    Reply
    • Brittany Hayes says

      March 16, 2015 at 8:48 pm

      Thanks so much!

      Reply
  2. Twila says

    March 16, 2015 at 4:33 pm

    Yes, FEARLESS is the right word! I would have been too scared to mess up the wood flooring. Awesome job as always; beautiful!…and what Amanda said 🙂

    Reply
    • Brittany Hayes says

      March 16, 2015 at 8:48 pm

      Awe thank you! You are both too too sweet! XOXO

      Reply
  3. Renee says

    August 8, 2015 at 1:24 am

    Love it! Your home is beautiful, a true work of art! Thank you for the inspiration!

    Reply
    • Brittany Hayes says

      August 10, 2015 at 6:17 pm

      Thank you so so much! How sweet! XOXO

      Reply
  4. Brandi says

    August 8, 2015 at 1:43 am

    Brittany, this is seriously so beautiful. I’m in love with your style. You’re absolutely Fearless!!!

    Reply
    • Brittany Hayes says

      August 10, 2015 at 6:17 pm

      Awe haha thank you! I love being fearless!! XOXO

      Reply
  5. Lauren says

    August 8, 2015 at 2:59 am

    I loved this headboard so much I purchased one for my little girls room! I have had bad luck in the past with metal bed frames and I was wondering what you connected your headboard too or if it was metal which one? Love this whole room so much ?

    Reply
    • Brittany Hayes says

      August 10, 2015 at 6:18 pm

      Thank you so much!! We did use metal. I haven’t ever had a problem with them though! Thank you!! I hope your project turns out beautiful!

      Reply
  6. Chassidy says

    August 8, 2015 at 3:17 am

    oh my gosh this is fantastic! I wonder if this could be done to concrete instead of wood. We have carpet that I want to pull up so bad, but we have concrete under it.

    Reply
    • Brittany Hayes says

      August 10, 2015 at 6:19 pm

      Thanks!!! Yes, I would definitely think so! You’d just want to concrete to be really smooth so that the stripe lines are straight. Let me know if you try it!!

      Reply
  7. Amanda Harkins says

    October 21, 2015 at 12:57 pm

    Hi will you ever be blogging this full room? I have been anxiously waiting and finally had to go ahead and guess on things because my daughter moved out of her crib :/

    Reply
    • Brittany Hayes says

      October 25, 2015 at 8:49 pm

      Yes, it is coming next Tuesday, 11/03! Thanks for reading… and anxiously waiting! LOL! XOXO

      Reply
  8. Lisa says

    November 6, 2015 at 11:30 am

    Hi Brittany,
    These floors are gorgeous! Thank you for sharing. I want to do something like this in my daughter’s room. You’ve given me lots of ideas!
    -Lisa (@cottagestyle)

    Reply
  9. Whitney Shortt says

    November 28, 2015 at 6:36 pm

    love it and that wallpaper is so pretty!!

    Reply
  10. Christian Kingsbury says

    September 14, 2017 at 6:25 pm

    Wow, these floors look great! My wife and I now have some new ideas 🙂

    Reply
  11. Angel Kyle says

    November 24, 2017 at 5:59 am

    Hardwood flooring is the best option for your flooring. There are variety of hardwood flooring options are available and from that you can select the best one. Designing part also play an important role so you should decide the best designing and style of the material. Coloring of the hardwood flooring is one of the best option. For this you should decide the best painting material so that it will be long lasting. And in your blog the way you explain how to paint the hardwood floors are really helpful to others.

    Reply

Leave a Reply Cancel reply

Your email address will not be published. Required fields are marked *

It may have taken seven years to get around to tac It may have taken seven years to get around to tackling our yard but now that John’s been working so hard on it and it’s finally coming together… it’s time to light it all up 🤩 We just added @hoselinkusa solar lights to our front landscape bed and we love them so much that now I want them EVERYWHERE! P.S. Linked them in my bio! P.S.S. They’re having a SALE right now too! #hoselink #hoselinkusa
#SturPartner Love these so much they’re getting #SturPartner Love these so much they’re getting a permanent spot on my feed 🫶🏻 They’ve become our little sparkling soda addiction. So much so that we’re on our second set of 12! And that’s saying a lot considering you only use two drops 😉 P.S. Got y’all a better discount code too! Click my link in bio and use my code Addison25 to get 25% off your Stur order!
You Do You 💗 P.S. My pants are from shopaddison You Do You 💗
P.S. My pants are from shopaddisonswonderland.com and yes, we ship! 🫶🏻
As I always say, the only journeys and experiences As I always say, the only journeys and experiences I can… and do… share are that of my own. And today it’s last week’s journey of my explant, lift and recovery. As someone who was “born” with big boobs, had implants to fill what I’d lost to weight loss and nursing to now having explanted to a much smaller size, I’ve been happy with every step along the way. It’s all been what I had or felt I needed or wanted at each stage of life and I’m not one to ever look back and have regrets. It’s just that at this stage of life, I decided the next step for me was to shed some chest. And kind of a lot of it. From a size 32G to a yet to be fully determined 32B-C! To be super honest, the pondering and deciding was by the far the longest and hardest part. With no direct reason for doing so (thankfully)… rather a combination of them from possible health issues 🤞🏻 associated with my implants to the usual back/shoulder pain to just a growing desire to get them out, I’ve felt a bit indecisive and very nervous. But last week I finally did it and I’m so happy I did! Women have so many worries and pressures and insecurities so if this has been on your pondering list as well, I’m just here to tell you that it wasn’t that bad. Any body change takes some getting used to but not gonna lie, shedding that top heavy feeling has been rather fabulous. And the cute little tops and bras I can now wear feel like icing on the cake! So from your always raw and honest IG bestie, thank y’all so much for following along and for all of the love and well wishes on stories. Means the WORLD 🫶🏻
Forget drenching your hands with straight acetone… and the hour and a half SNS process… try this and you’ll never go back! Yep, it’s the “old school” tips method but with your own nails. Takes so much less time and although still not exactly CLEAN, it’s way better than an acetone hand bath every two weeks. Plus, they’re actually much smoother too!
Happy 11th to my Winnie 💗 The happiest, most fr Happy 11th to my Winnie 💗 The happiest, most free spirited, kind hearted, fun loving, never stops twirling little girl. I pray you never lose your spirit! Love you Winter Hailyn 🥰  Follow my shop @addisonswonderland on the @shop.LTK app to shop this post and get my exclusive app-only content!  #liketkit #LTKhome #LTKkids #LTKfamily
@shop.ltk
https://liketk.it/4hI9c
*Comment LINK* and I’ll send you quick access to *Comment LINK* and I’ll send you quick access to all the links directly to your inbox! FALL-ing into Fall with FIVE looks from @walmartfashion ♥️ Come on ladies, tell me I’m not the only one! 😉 Sharing these five outfits and more of my faves RIGHT HERE… #WalmartFashion #WalmartPartner
Follow my shop @addisonswonderland on the @shop.LTK app to shop this post and get my exclusive app-only content!  #liketkit #LTKunder100 #LTKSeasonal #LTKunder50
@shop.ltk
https://liketk.it/4hrkU
Where did you find the drapery hardware in your ba Where did you find the drapery hardware in your bathroom?... what about your bedroom?... living room? It’s all @kirsch and it’s all STUNNING! Scale is everything in design and sometimes the biggest “misses” are in the details. With a huge assortment of difficult to find, thick rods, substantial finials and beautiful rings, as you can see something as “simple” as drapery hardware can absolutely MAKE a space. Linking to Kirsch in my bio!

Visit Addison’s Wonderland

Copyright © 2023 · Addison's Wonderland · Design By Alpine Lane · Privacy Policy